Showing posts with label US Navy. Show all posts

Monday, May 4, 2015

The Battle of the Coral Sea

Seventy three years ago the world witnessed a rare and bloody revolution: the world's first carrier battle. In some sense this is a bit of a technicality. It wasn't remotely the first battle employing carriers. That had occurred some thirty years prior. It wasn't the first time aircraft attacked a ship at sea. It wasn't even the first time both sides in a battle had either aircraft or carriers. (Though it might have been the first time both sides had both.) But it was the first time two relatively closely matched opponents each fielded carrier borne aircraft as their chief offensive elements. It was, in that sense, the first battle between carriers, which makes it something of a watershed event. A few weeks back a friend of mine challenged me to post a series of photographs of miniatures from my collection. In doing so I chose in part to depict this battle. Here follows my most recent foray into the field of not so special effects:

Imperial Japanese forces muster at Truk. Takagi's Mobile Force takes on supplies and fuel before proceeding south for Operation Mo.


Elements of the mobile, support, and occupation forces are visible in the background as well as local guard and support forces.

USS Lexington is hit by two Japanese torpedoes. A Shokaku B5N  from Lt. Ichihara Tatsuo's section can be seen escaping north with an F4F in pursuit.

 The same event as seen from USS Minneapolis. A second B5N, presumably from the same section, is visible to the right, above Yorktown. The aircraft behind the torpedo splash is most likely that of Ens. Leon Haynes of VF-2.

TF-17 as seen from an unnamed D3A. A number of fighters can be seen spiraling in the center of the picture and a D3A is in the foreground at lower left, probably that of strike leader Lt. Cdr Takahashi Kakuichi

Much of this is at least a little speculative, of course. I don't have the positions of the Mo forces at Truk preceding the battle, nor is my hastily constructed harbor an accurate representation. The positions of ships in TF-17 are as faithful as I can make them with the information I have. The aircraft positions are more speculative, but represent things approximately as they might have been at about the moment of the attack. All of these I must credit to John Lundstrom's First Team, though the mistakes are my own. I probably have Haynes pursuing the wrong aircraft, but he was indeed chasing a B5N attempting to make good its escape.

The fighters circling in the foreground are four F4Fs piloted by Lieut. Fred Borries Jr, Lieut. (jg) Marion Dufilho, Lieut. (jg) Clark Rinehart, and Ens. Newton Mason along with a pair of Shokaku A6Ms (the leading element of six Zeroes about to fall on the F4Fs.) Borries and his squadron mates banked left into a maneuver called a "Lufbery circle" in a vain attempt to continue climbing after the incoming dive bombers. They quickly found themselves outnumbered and unable to escape the nimble Zekes. The timing of this fight might be off a little, but the formation is so famous I wanted to include it. (It would ultimately number some eight A6Ms and five F4Fs with another American pilot diving away nearby with yet another Zero in hot pursuit.)

The sharp eyed might note that the markings of the involved aircraft are incorrect, as all are models attempting to depict a different battle about a month later. But at this resolution that's hard to see so I hope it's forgivable. Lex's quite visible deck park is another slight anachronism that I wasn't willing to modify for a photo shoot. At the time of the attack her decks would doubtless have been clear.

So there you have it. This is all a little crude, but I don't think it looks too bad. I hope you enjoy it. Here's  to the brave men who fought to protect their countries and families that day. You are not forgotten, nor have your sacrifices been in vain.

Sincerely,
The Composer

Wednesday, August 13, 2014

No Draught-Dodgers in the Merchant Marine

There could be several reasons for this: Maybe you can't just "comb the wakes" of requisition orders. Guided missiles, those. Maybe it's the desire to avoid grounding and subsequent loss of pay. Or perhaps it has something to do with the ale-lager-porter-pilsner-stout house. I've yet to meet the sailor who could pass up a decent beer. (With the definition of decent enjoying significant regional variation, of course, but sailors, by-and-in-large, seem a flexible lot on that point.)

Anyway . . . after that terrible bit of nonsense we shall get back to small ships.

Some weeks back I implied that there were more ships waiting to be posted. Below you will find a variety of different merchantmen conscripted into military service. (Or built for it, but with an eye on a civilian life after the war.)

In this first picture we have, from front to back, Dodd line steamer SS King Edgar, US Liberty Ship SS Jeremiah O'Brien, French transport Golo,  and finaly Canadian pulp and paper carrier SS Corner Brook. The first model is a C in C "Doxford." It's a nice size ship that adds a little variety, but the casting is a little flat for my taste. The next two ships are Viking Forge castings of Seabattles originals; both quite excellent. Finally in the back is a casting I've not yet managed to identify. It came as part of job-lot. It feels rather like a nicer C in C ship, but I can't find one matching it in their catalog. No matter the original, it's a decent fit for Corner Brook. (Please do remember my merchant and auxiliary ships are often much more approximate than my warships. I research them and attempt accuracy, but there are times all I can find is dimensions or even just registry tonnage. My depictions should not be misconstrued as fact. They are gaming models to which I attempt to impart character through research and detailing.) Here's a closer shot of Corner Brook. If anyone can positively identify the model I would be grateful.


Below is a much loved Texaco ship, SS Ohio.


This model represents a rather more extensive conversion of a C in C T2 tanker. I had intended to show in progress photographs of this ship, but I seem to have inadvertently deleted them, so I will do my best to describe the process. I began by removing the catwalks, thinking Ohio had none. I later regretted this, as I found a good model that I believe to be accurate with a catwalk aft, thus I was obliged to fabricate a new one. Fortunately, this isn't a particularly difficult task.

The most interesting part of the conversion was the quite obvious maze of piping forward of the island. Ohio was outfitted with pumping equipment so that she could offload at unimproved ports. I suspect much of this piping represents that equipment. For this I used .010" styrene rod, which is rather small and quite flexible. I cut an approximate length and immediately glued the forward end to the deck just aft of the fo'c'sle, securing it in place. Next I made each 90 of the expansion loop and tacked that down as well. Finally, I trimmed the excess rod off and glued down the aft end. This could be a little imprecise, as this end would be covered with even more pipes later. By this method I was able to create a simplified approximation of the pipework on the larger model. (I've not yet found a photograph of Ohio from above, so I can only assume the model is essentially correct.) Once all of that was in place I added the second layer of piping just forward of the bridge and a few large pipes aft. Since these were all straight there was no particular difficulty. Finally, I finished her off with the usual masts and spars and painted her up making what I believe, if you'll pardon my presumption, might well be the finest 1/2400 model of Ohio on the net. (She's the only one I've seen with roughly correct deck detail.)

Lastly, since I don't have art of the above conversion, I'll discuss my conversion of AO-1 USS Kanawha, which was similarly extensive. This ship began life as a Viking Forge model depicting her approximately as she appeared in WWI. Like most other ships that served in both wars she'd been extensively updated in the interim, so I stripped her almost down to the deck. I started by removing the aft portion of the catwalks and forward island, since these had both been replaced between the wars. I saved the island for re-use. It became the core of an enlarged amidships island. Next I built up the platform deck aft of this island. Since this is a rather rough casting without terribly much detail I elected not to completely strip the paint. In retrospect this was probably a mistake, but I can live with it.


Next I added masts, platforms, AA weapons, a searchlight, and anchor chain. I've attempted to use the stern gun as a pattern for a new mold, but I haven't been completely happy with the resulting castings, so I suspect I'll continue building up large caliber DP weapons for a while yet. The second mount aft of the bow and the second to the last forward of the stern are two of the much maligned "Chicago pipe-organ" quad 1.1s. I still don't have a decent master of that either, so these too I built up. (For those unfamiliar, I squash cast dual and quad 40s and plan to cast more details as I manage to make decent molds.) 


Lastly I added spars, radar, ventilators, ship's boats, and crow's nest. (Yes indeed, it would appear Kanawha had radar by mid 1942. That or there was a program to lash bed-springs to the mast of every ship in the Navy to fool enemy observers . . . who were generally too far away to see that kind of detail . . . or maybe GE and Westinghouse and friends just cranked out that many sets.)


Here's how she eventually turned out. Not perfect, but not at all bad.


As always, thank you for reading.

Sincerely,
The Composer


Thursday, July 31, 2014

Scrap Iron Heroes

It probably won't surprise anyone to hear that I have a soft spot for small quirky ships. The Scrap Iron Flotilla is a classic example of such:


These five hand-me-down destroyers served in the Australian Navy. They were a little like the naval equivalent of the comfortable old pants that weren't quite in style anymore that you found at the Salvation Army. They were warm, the price was right, and you needed winter clothes, so you bought them only to have the fashionable rich prick with the next locker over deride you for it.  In this case the fashionable prick was the Nazi propaganda machine, which bequeathed the moniker "Scrap Iron Flotilla" on these fine destroyers. They served with distinction through the arduous early war, initially in the Mediterranean, where Waterhen was lost supplying Tobruk, and later in the Pacific, where Vampire and Voyager met their fate at the hands of Japanese bombers. At left in the photograph is flotilla leader HMAS Stuart, followed by Waterhen, Voyager, Vampire, and Vendetta. Below is a second picture with the four V class destoyers (don't ask me why Waterhen is a V. Maybe she's a double V) along with HMNZS Achilles of River Plate fame. Vendetta is now in the foreground with Vampire, Voyager, and Waterhen behind her.


The next ship didn't start out as scrap iron, but sadly became so when it found its way to the bottom of Savo Sound. It was quite a new ship at time of loss, actually, but her history makes her almost as quirky as the five tin cans above. Her fate is particularly tragic since she had perhaps the best picture of the situation, having a newer radar set than her teammates. But perhaps because of her diminutive size the admiral in tactical command broke his flag aboard San Francisco. Quite ironically, Rear Admiral Norman Scott had gotten himself rather lost aboard San Francisco several weeks earlier in a crazed melee that turned out rather well for the Americans. At the reprise things went more poorly and Scott paid with his life. (As did the OTC, Rear Admiral Daniel Callaghan.) Not only did two different American admirals die that night, (one aboard our subject) but the five Sullivan brothers died aboard or in the water awaiting rescue after the fight.


The ship is, of course, USS Juneau. I typically try to paint my ships in a mid 1942 scheme, and Juneau is no exception. (I target a date in June of 1942 as closely as possible. Not really sure why, mind you. And if you believe that . . . ) While I admit I'm happy about my choice, I might well have broken it if Juneau had ended up in these duds any later. This oddball hybrid scheme amuses me so greatly I might have chosen it had it been applied in 1943. (Which isn't possible, of course, as paint doesn't really dry well underwater.) However, the fact that this is both the paint she wore at miraculous mid-year and on the date she met her tragic fate makes it an absolutely sure thing. No other scheme would suffice. For the curious, the model is an older Superior casting of a first run Atlanta.

So here's to the men who served aboard the scrap-iron, those who lived to tell the tale and those who paid the ultimate price for what they believed in; defending their families and countries and ways of life. Here's to the scrap iron heroes. You did what needed doing.

Monday, June 30, 2014

Winning the War on a Tide of American Oil

Whatever your politics or the state of your scientific literacy it's fairly easy to see WWII as an "oil" war. Suddenly everything was mechanized and everywhere you went everyone wanted a little slice of the oil-pie. It was a war about burning gas: tanks, airplanes, trucks, diesels, ships with bunkers full of unrefined sweet Java crude . . .

Somewhere someone once said that the Allies "floated to victory on a tide of American oil." I've heard it attributed to Churchill, but googling about isn't really helping much here, so I won't worry so much about who said it. The truth of the matter  is, I think, more or less self-evident.

But getting that Texas, Pennsylvania, or California distilate to the fronts where it was needed was a a complex matter, and that's where tankers and oilers come in. Some of the first merchant ships I bought were oilers: a pair of German tankers repurposed to serve as Cimarrons and two Shiretokos, one of which was apparently converted into a seaplane tender (the subject for a future conversion, no doubt.) But these early efforts were remarkably crude and unsophisticated. (And the "Cimarrons" were later rebuilt into civilian tankers.) I've gotten a little better at the game since.

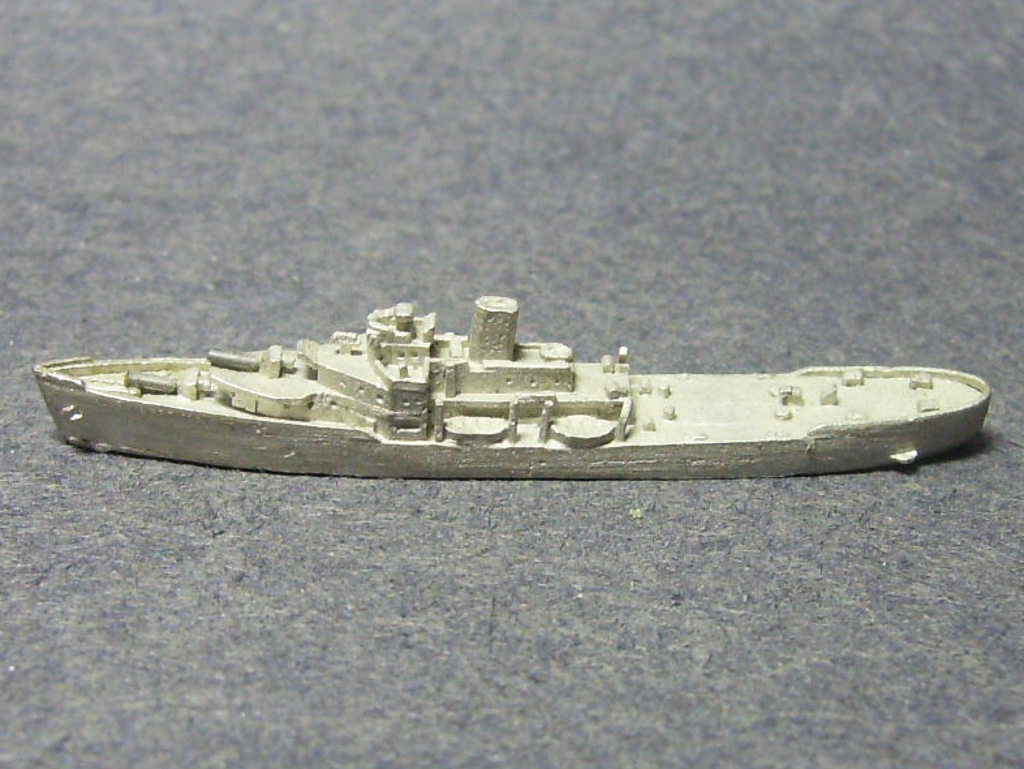
Like most naval developments of the twentieth century, fleet oilers found their genesis in the Royal Navy and matured rapidly in the U.S. Navy. One of the earliest U.S. offerings was a class of oilers named after rivers (as would become standard practice) called the Kanawha class. I've chosen to depict USS Maumee, AO-2.


AO-2 differs identifiably from AO-1 in engineering plant, among other things. Where Kanawha was a conventional steamship of her age, AO-2 Maumee was one of the first U.S. ships of her size fitted with diesels. Not surprisingly, the funnel arrangements of the two ships are visibly different. Maumee carries hers farther aft. More about Maumee later.

Next up we have a trio of Cimarron class oilers from as many sculptors. The farthest, Kaskaskia, is from Viking Forge, though with considerable interference by yours truly. This is an older model that I include only for comparison. Second from the front is Platte, from a casting of a Seabattles original. In front is the GHQ model I used for Cimarron herself. The front two are a little closer to manufacturer's original, but both have aftermarket booms and radars, and the GHQ ship also has new masts. 


If you've spent much time studying auxiliaries, you'll no doubt have noticed that the armament was both inconsistent across classes and quite flexible over time. The Cimarron class is a nice example. Encyclopedia articles will tell you the "class" sported four 5"/38 DP rifles and a Mk 33 FC director. On paper the US Navy wished this to be true. In reality the armament varied considerably and tended to consist of whatever was available and more or less appropriate at the yard when the ships were taken over. (Though I suspect they all did have the FC set.) The careful viewer will note that all four of these are different. The REALLY careful viewer will say that this is quite appropriate. The EXTREMELY careful viewer will tell me where I have screwed up and exactly what each ship ACTUALLY sported in mid-1942. I hope that this viewer is an ordinance officer from the USN in 1942, which means, sadly, that he probably can't correct me anymore. (Which isn't to say I don't make mistakes, just that I hope they're pretty small.) If corrected I will GLADLY fix my mistakes. (Very gladly for vets of the ships depicted.) In the meantime, I'm doing my best. Please forgive any mistakes you see and feel free to offer corrections (with footnotes please). I want them to be right, but I will accept "close enough." (And I confess to certain artistic liberties to make them look better from a scale mile away.)

Anyway, in spite of their varried and colorful origins, I think they make a fairly convincing class. The forward two are beamier and more detailed, but not beyond comparison with the other (after appropriate refitting).

Of course in reality, much more crude traveled in civilian bottoms. Below are two that flew the red ensign.


Well, more or less. To starboard (from the ships' perspective, of course) is a ship I'm calling Inverarder. In reality this was a demilitarized version of an oiler ordered by the RN and intended to be War Hagara that British Mexican Petroleum was using as a tanker. Trouble is, while the model is about the right size and apparent age (it was a Viking Forge collier Mars) the arrangement of the War class oilers appears to have been quite unusual: engines amidships in a three island structure, much like a conventional freighter and not at all like an engines aft tanker. (Or collier.) Oops. Well, ignore that. I was having a devil of a time finding a tanker of about the right size and age still in service in Britain by 1941 (searching the 1942 E. B. Talbot-Booth, Roger Jordan's The World's Merchant Ships: 1939, and sundry places online), so let's just play pretend and ignore the defects on that one.

The ship to port is perhaps closer, but also rather fanciful. She's meant to depict (approximately) a British coastal tanker called Lunula operated by Moss and Co. I was able to find one picture of her online . . . afire and sinking after striking a mine in the Thames. The ship was already awash amidships and going down by the bow, so everything forward of the mainmast is pure speculation. (Given that there was no foremast sticking out of the water I assume she had none, but even that is far from a safe bet.) Still, the funnel colors are correct, and the hull was at the least dark. (Though many things look dark when below clouds of roiling black smoke.)

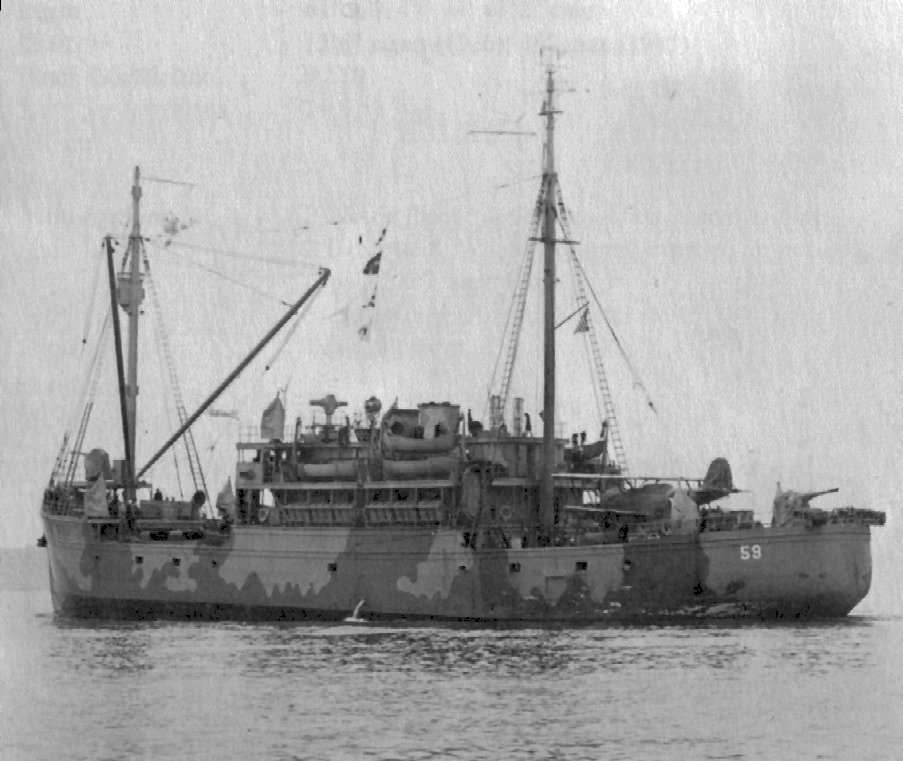
Where the two ladies above both sank, both the girls below took torpedoes and lived to tell the tale. These are somewhat better depictions of two tankers from one piece of the grandly dismembered Standard Oil, Standard Oil of New Jersey or Esso.


The rear ship, a C in C T-2, depicts a ship called Esso Bolivar operated by an offshore subsidiary called the Panama Transport Company. That in the foreground approximates John Worthington, which served Esso directly. Esso Bolivar took a torpedo in the early days of the war while carrying a shipment of water, which may well have saved her from a firey death. After being hit she apparently soldiered on towards Guantanamo, suffering the indignity of continued shelling until the captain ordered her abandoned. Fortunately, the cavalry had heard her distress signal before the radio was shot out. A minesweeper found the U-boat still shelling the abandoned ship and scared her off before picking up the crew. The next day a rescue party went aboard, restored power, and sailed the ship to Gitmo.

John Worthington was slightly less lucky. She survived the attack, off the coast of Brazil, put in to Trinidad for temporary repairs, and ultimately made Galveston for overhaul, but the damage was deemed to great for economic repair. She was ultimately abandoned and sank in shallow water where she lies to this day.

Thus concludes the present edition of the NIFTI miniature naval gazette. We'll talk more about building Maumee, transporting dry(ish) goods, and escorting these large floating targets through sub-infested waters in the next issue. As always, thank you for your indulgence.

Thursday, May 2, 2013

Minor American Combatants

Minor combatants are often amongst the unsung heroes of naval warfare. (They're in good company with auxiliaries and merchant vessels. Everyone likes solid teeth in their military, but without a good logistical tail the teeth have very little bite.)

I've long been interested in minor combatants and lately I've begun to find more sources for off the shelf models of these. Most notable amongst these is the Seabattles line which is available in the U.S. as recasts from Viking Forge. While the models from this line aren't quite as crisply cast as GHQ, the models have a lighter, more delicate appearance and look fantastic painted up, and since most are one piece castings even inexperienced modelers will enjoy them. I bought two packages in the U.S. range: the Treasury class cutters and the USCGC "Party Pack."

The first contains four models that look something like this:


This depicts them more or less as they looked before the war, so I felt some changes were needed to militarize them. As the war grew longer the Navy added more and more armament to these lovely little ships, but the first round primarily saw the addition of an improved AA suite and some additional ASW weapons. I started with USS Ingham, which was a little less modified early war than some others. I worked from this photograph I found on the Historic Naval Ships Association website:


This is apparently a modified version of what was called the "Thayer" system of deceptive camouflage. Thus far this scheme is unique in my collection. If I understand the early war changes correctly, she had one of her 5"/51s landed and gained 2 smaller mounts forward (possibly surplus 4"/50s), a pair of smaller mounts aft (possibly surplus 3"s), two autocannon/machinegun grade mounts, and some ASW astern. I didn't attempt to depict the ASW, but you can see my changes to the AA and surface fit. [Thanks to Carronade on WW2f for the corrections.]


Further, I added the mast, the searchlight platform, and the bedspring antenna according to the usual crushed styrene stock method.

The next ship was much more satisfying:


This one took some real research. She came from the "Party Pack." One of my only complaints with Viking Forge thus far is their refusal to sell the other cutters in their inventory individually, selling them only as a random selection from a pile of prewar, wartime, and postwar cutters. (If I were going to be uncharitable I might guess that all the cutters accidentally ended up together and rather than try to sort them back out it was decided to shake up the box and sell them in "booster" packs a la Magic the Gathering [of Your Money.]) It was on me to figure out quite what I had. Careful research helped me identify some of them, but only after I found a complete Seabattles catalog saved in my files, lord knows where I found that, was I able to confirm some and correct the rest.This turns out to be USS Northstar. (IX-148 to the Navy, WPG-59 USCGC Northstar to the Coast Guard.) And I was absolutely endeared by the dainty little ship with the SOC aboard aft. I attempted to depict her as I found her in this picture from NavSource:


Last but not least is a pair of tugs I acquired from Panzerschiffe:


The dark blue one wearing MS-21 depicts USS Vireo, which attempted the rescue of USS Yorktown. She was built as a Lapwing class Minesweeper but later reclassified as a fleet tug (old) ATO-144. The nearer ship, wearing MS-22 graded paint, depicts USS Navajo, AT-64. Navajo survived air attack and numerous tricky tows in the Guadalcanal campaign only to be lost to a torpedo from I-39 en route between Bora Bora and Pago Pago in the Spring of '43 far behind the front lines.

These two models required a bit more work than the Viking Forge acquisitions, but the end result is fairly satisfying. All of the above might call at a South Pacific harbor like this one:


But discussion of that can wait for a later post. Next up: Imperial Japanese tiny terribles (and a few heavys.)

Thursday, March 15, 2012

Two Conversions of One Model

In the same vein as previously . . .

Yet another fire sale purchase: a pair of Vestals. This is a bit of a problem as, so far as I can tell, Vestal was a singleton. But even beyond that, I was a little disappointed to find that Vestal was depicted in her 1920s guise. The ship that sat alongside Arizona at Pearl looked DRAMATICALLY different, as her entire superstructure had been scrapped and replaced in a refit just previous to the war.So following in the footsteps of the institution I'm trying to model, I cut Vestal off at deck and built up from there.


You can see that I extended the fo'c'sle deck with some rectangular stock. Small cookies cut from large cylindrical stock serves as gun tubs for fours and fives. You can glue them to the deck and then file them down to make them narrower. Slivers of scrap serve as splinter shields and the breach sections of the exposed artillery and very small cylindrical stock cut to length works for masts and barrels. More cylindrical styrene stock squashed with an appropriate size of pliers makes half decent anchor chain.

I fabricated the superstructure from rectangular stock. The center of the bridge is two pieces sandwiched together with a third laid flat on top. I filed all of this down to a suitably angular shape. and added the detached wings with two more small pieces. The center superstructure is two long pieces sandwiched together. Another two pieces placed outside them serve for the odd outboard structures.

At this point, it's rather wise to paint any approximately "interior" spaces a suitably dark color (like black). Extensive "negative" space (like an open hangar deck, say) can be virtually impossible to paint later.

Being the occasional fool, I didn't. (I've always done this before. Why oh why didn't I this time?) I still find myself trying vainly to touch up brilliant white bits that I notice in the middle of everything.

But anyway . . .

Tiny pieces of strip styrene served to bridge the void so that I could place C in C boats and launches atop them. (C in C sells several sets of detail parts in their WWI line. They're well worth the investment.) You can bend a piece of modest cylindrical stock and cut it off just at the elbow to make ventilators. Small pieces of flat styrene cut to shape can be used for Carley floats and additional ships boats. Simply painting the center black will usually suffice to make it look contoured. Additional pieces of rectangular stock can be filed into triangular shapes to serve as deckhouses. All added together, they give the ship a suitably "cluttered" appearance.

Dip it in blue paint and you have a U.S. auxiliary suitable for use in the Pacific. (Okay, I didn't really dip it in blue paint. Nor did the U.S. Navy, but sometimes it's hard to tell.)


In some ways Harry Lee was actually easier. Of course, finding another WWII auxiliary of about the same size as a ship first ordered in 1904 took some doing, but once I'd found my candidate I was pleased to note that the superstructures were similar enough that I didn't have to scrap this one. Harry Lee was about 10 feet longer and about 2,000 tons lighter, which is pretty much within the margin of error at 1:2400.

The biggest difference is the deck. The fo'c'sle deck extends all the way to the bridge. In fact, it steps up just forward of the superstructure. This had to be filled and built up with more large strip stock. Masts, armament, and deck fittings worked much as on Vestal.

The only new items were hold covers and Higgins boats. For hold covers I use large squares of thin sheet styrene. The Higgins boats, or LCVPs, are carved out of the standard rectangular blanks. I used a small chisel to cut a shallow indentation for the suggestion of the troop compartment and filed the stern into a flat triangle. They're not perfect, but at table distance they look pretty tolerable.


Thankfully, I got to paint something other than blue for a change. The MS-21 truly disappears against my "ocean" in the right lighting conditions. It makes much much better "camouflage." But it's much less pretty and not remotely as much fun to paint.


So there's my first APA.

Fitting Out Ships from New Builders

So for my next installment let's talk about fitting out ships from different builders. When you're running a serious navy the chances are pretty good that no single builder will make a ship you find completely satisfactory, and you'll spend some time fitting them out on your own even after delivery. (Maybe even after commissioning.)

I've talked a lot about Panzerschiffe in the past, so I will concentrate on companies that cast in metal today. I now have experience with four of these. (Well, five, really, but I'll leave the last one out, as it's a rather special case and if I ever commission their ships it will be as wreck markers.)

To wit: I've bought and built cast metal models from GHQ, C in C, Superior, and Viking Forge. All four make quite acceptable ships, though I tend to invest more work into some than others in order to make them match my mid 1942 ideal target date.

I'll start with GHQ. Scuttlebutt from experienced mariners generally has it that they make the best ships, and their models are indeed lovely. Other builders give them a run for their money in one way or another, but they're quite worthy ships. Even so, I find I need to add a few fittings. (The occasional mast or radar set, for instance.) To model USS Bunker Hill I used a GHQ "CV-10 Yorktown." I bought her from a surplus auction rather than new from the builders, so fitting out required a little more work than usual as the 5"/38 twin mounts were missing. Still, when you can save your taxpayers 75% of the cost of a capital ship, you find a way to replace those missing DP mounts.

I went a little further, though, opening up the hanger by drilling holes at the bottom of the cast on roll up door, cutting out a series of triangular sections, and then clipping/breaking/jiggering off the remaining teeth and filing away the excess to square it up. The floor was made of a piece of sheet styrene. The deck was a little thick, leaving the overhead unpleasantly low at the hangar door, so I filed the visible portion of that down as carefully as I could. You can see the result.


You'll also notice that I added a spar and homing beacon to the top of the mainmast. (Not really sure why GHQ doesn't depict those, since they include so many other fiddly bits.)


With a nice coat of MS-21 Navy blue and some deck blue stain (Apple Barrel Navy Blue and Midnight Blue, in this case) you end up with a fairly nice model. In this case I actually did base in grey, giving a somewhat brighter look than some of my other MS-21 offerings. I used a very dilute black wash to add shadows, brushed on another light coat of my primary color, and highlighted up with a variety of lighter blues and greys to give it that weathered, sun-faded look.


Making Katsuragi out of a Superior Soryu comes in the next post.

Wednesday, August 17, 2011

Scratch Building an Island

Specifically USS Long Island:


This might well be obvious from my collection, but I am particularly interested in the early part of the war in the Pacific. The part where it wasn't yet entirely clear who was going to win unless you'd looked at shipyard capacity in the two countries. (Or aircraft factories, or automobile factories. Or steel mills. Or oil refineries. Or . . . never mind.)

Anyway . . .

I'd built a lot of big fleet carriers on all sides, and even a few smaller and earlier British and Japanese carriers, but no U.S. escort carriers. This was an omission I very much wanted to correct.

In particular, I wanted to build AVG-1, USS Long Island. Since she's the inaugural U.S. example of the type, she's pretty significant. Further, Long Island, shuttled many of the first aircraft of the "Cactus Air Force" to Guadalcanal. That alone is more than reason enough to like her. (The Marines surely did.) Yet no one manufactures a commercial model of this ship in 1:2400. A travesty, I say.

So I set about building my own.

At first, I'd considered making the hull from "green stuff" type two part epoxy. This might, I suppose work, but I was only just beginning to explore the stuff then, so I went about it rather the wrong way and chose to use a tried and true ship modeling technique instead.

Balsa wood has gotten a rather bad rap recently, but it still has some significant advantages: It's cheap, it's easy to work with, and it's fairly widely available.

So I used it for my second (and successful) attempt at a hull. I began by cutting a block to the maximum dimensions of the hull and hangar. Next I sketched the most prominent outlines directly onto the top of the block. I then used a razor saw and exacto knife to trim the block back closer to this sketch. I cut angles into the front and back of the block to sugegst the bow and stern and cut and filed a notch between the rear part of the hangar and the fo'c'sle. (I chose to build up the forward portion of the hangar from styrene, since it was quite a bit narrower.) Finally, I used a variety of files and sand paper to clean everything up.

Now that I a hull it was time to start adding superstructure. Long Island is a little different from later escort carriers for a couple of reasons, one of which is patently obvious: the hangar is quite small and doesn't extend forward of roughly amidships. Everything forward of that is quite open. The forward half of the flight deck is supported on open trusswork making her look even older, in some ways, than she really was. I used stock styrene to make the narrower front half of the hangar and all the trusses to support the flight deck. For the hangar walls I used .04" x .08" rectangular strip and for the trusses I used .015" round rods. Both are available from Plastruct. I also made the 5"/38 stern chaser from the same materials. The 3" AA mounts in the bow were made from .01" rod and added later.

The next step was building the flight deck. I chose to make this out of heavy cardstock. To approximate the galleries along the sides I laminated two pieces of cardstock together. The first was slightly narrower than the second, creating a "step" around the edges. Once that was done I made gun tubs and the little stub of an exhaust stack from the strip syrene. I then glued these to the sides of the deck and filed them all back to match. Last, I cleaned everything up, and fixed the deck to the hull.

With the addition of a mast and radar made from more of the .015" rod and some strip squashed up in a pair of pliers (for a sort of "chickenwire" effect) you end up with this:


You might notice a little green stuff on the bow. One of the constant problems with balsa wood is sealing up the rather grainy texture. I first attempted this with the green stuff. When that didn't work quite work I turned to spakle. (DAP walboard joint compound, to be exact.)

The spakle, once dried, worked out fairly well. I was able to sand it down to a relatively nice smooth coat. It could chip, I suppose, but thus far it has not. I figure if it holds up in a wall it should do well enough in a model.

And with some paint and those 3" AA mounts you get this:


Now that I'm comfortable making anchors, anchor chains, and some lighter AA I might eventually go back and add them, but for now, that's not too bad if I do say so myself.

Sincerely,
The Composer.

Saturday, August 13, 2011

Painting Princeton

In mid 1942 the US Navy suddenly found itself short of flight decks. (This was going around. Britain and Japan had felt the same squeeze. Something about bombs and torpedoes being particularly hard on ships and sailors.) So we started carving up our half completed ships and turning them into carriers. (You could think of it as kitbashing on 1:1.)

We picked some Cleveland class cruisers for the project and the Independence class light carrier was born.

My first foray into this class was with a Panzerschiffe miniature. They're robust and easy to work with, but rather plain unless you invest some time and effort. I'm a poor man, so my time is cheap and my money is not.

. . . Besides, I very much enjoy converting things.

And it seems so does the fellow that owns Panzerschiffe. When I pulled off the flight deck I was quite surprised to find turrets and the remnants of a superstructure underneath. Looks like his Princeton is quite literally a converted Cleveland. How funny is that?

So anyway . . .

Once I was done adding all the usual bits like masts, radar, and extra gun tubs this is what I had:


You might notice the green bits. I've been experimenting with a technique called "squash casting." It's pretty simple really. Your original has to be one sided and can't have any "negative space" or overhanging spots. You can carve it from styrene, build it up from pieces, or even make it from something like polymer "clay" or "green stuff."

Once you've got that you take a ball of "green stuff" (or clay, sculpey, what have you. Something that can be made to harden), and fix your still workable ball to the end of an appropriate handle. (Dead paintbrushes work well.) Next you wet the original with something that will act as a "mold release." I use water, since I've been using a two part "green stuff" style epoxy. Press the ball that will become your mold straight onto the original and pull it straight back up and let your mold harden. (With the green stuff you just wait.)

Once you've got your mold you press it onto small pieces of similar materials to create positives of the same thing. Repeat ad infinitum and presto! You have as many Borfurs forties as you need.

But I digress. I should continue on to the actual painting. Well, almost. There is some prep you might want to do first.

The pros advocate washing the model to remove any mold release, but I've never found that to be necessary. I also don't bother with a real "primer" coat. I just use a coat of the same craft acrylics I use later for the color coats. (I've become a big believer in craft acrylics. I find the results to be every bit as pleasant as more expensive hobby enamels at a fraction of the price.)

In order to handle small miniatures while painting them I find you have to at least temporarily affix them to some kind of base. If you're going to permanently base your miniature there's no reason this can't be the real base. I don't base my ships, so lightly glue them to a "painting base." Any old flat something or other of about the right works. I've got some scrap metal plates, some old fantasy model bases, and even a piece of linoleum tile.


Now to the painting. (At last!)

Step 1: Apply a basecoat.

There are several ways you can basecoat a model, and I've begun to dabble with others at least occasionally, but most of the time I use black. It's a little bit more work to cover it and the colors look a little darker when you're done, but the shadows look great and it saves you the step of "black lining" around details later. (Though it's still good policy to touch up.)


Step 2: Add color.

This part varies a bit based on what color I used for my basecoat. If I'd used grey I'd apply a liberal black wash to settle into the cracks and create dark shadows. (For which I use a very watered down bottle of the same craft acrylic.) Call that Step 1.5, if you will. But with a black base, which works particularly well with schemes that are dark to begin with like the US Navy's ever popular MS-21, which just happens to be the color that Princeton wore in 1943 and how I chose to depict her, you can proceed directly to applying your basic colors.

With naval miniatures this is typically at least a two part process, since you'll want the deck and hull to be different colors. I usually start with the deck and paint the hull later, since it's often harder to get the deck color into the nooks and crannies without getting it on other vertical elements of the ship. I should also add that I like to use heavy brush strokes to simulate planking runs on decks. This turns about to be surprisingly effective. More on that later.

After you've painted your deck you can go back through and touch up the black on anything that's not deck. Once that's done you can start painting the smaller vertical bits. This will require a relatively fine brush, since you want to avoid getting non-deck colors on the deck. I like to leave a very small "shadow" line between my vertical color and my deck color. (Which is how I avoid "black lining" when I use a black basecoat.) I also tend to leave such "shadow lines" around important details, which helps to give the finished model a more defined appearance when viewed from normal table distances.

Larger surfaces, like the sides of the hull itself, can be painted with a larger brush. It's a little quicker and less brushy that way.


Step 2.5

Highlighting is a complicated subject, and I don't always do it the same way, but at this point you can begin to highlight if you wish. Alternately you can save it for the last step. If you choose to highlight at this point, you will want to use a lighter version of whatever your primary shade is. (A lighter blue to highlight navy blue, for instance.) And you will want to avoid highlighting the deck in the same color as the superstructure and hull. In this case, I didn't bother. I was perfectly content to leave the ship fairly dark and simply highlight everything by drybrusing at the end of the project. As I've begun to build more detailed models I've also begun to spend more time highlighting them, but this was a transitional project and the paint job was fairly simple If you want a nice "quick and dirty" gaming miniature this is a good example, but if you want a showpiece you might want to spend a little more time between step two and step three.

Step 3: Add markings.

Now there's some variation in how I execute the next step. This is the most usual order, but sometimes it's actually easier to paint these markings onto big flat decks before you paint the deck color. It depends a little on what you want to achieve. Recall that I tend to try to paint thickly and brushily on decks so that I can use the brush strokes to approximate planking runs. On Japanese carriers, where the planking runs run fore to aft it's quite easy to paint the markings first, touch them up, and then apply the deck color. (Leaving just a hint of a black line around the markings to make them stand out, as above.)

With American carriers, where the planking runs across the beam of the ship, I started painting the deck first and then adding the marks. I've since reexamined this, since it's been making the effect almost too pronounced. (Touching up adds another layer of brush strokes in some places, but not others.) Still, that's what I did in Princeton's case, and while not perfect, the result is good enough for my purposes.

This is also a good time to add black dots for portholes and bridge windows if you want to get that involved.

Step 4: Highlight and weather.

At this point I like to add a nice final highlight to draw everything together and give the ship a weathered appearance. For most ships I find that I can simply drybrush lightly with a very light grey. It will help to make the "shadow lines" look more subtle and less cartoonish. It also helps to hide places where the color isn't quite even. Finally, it helps to bring out small details like those brush stroke planking runs.

You want to be fairly light with this. When I've used it too liberally it looks like my ships have been caught in arctic storms. But on the other hand, some variation in a fleet isn't a bad thing. It helps to approximate different wear and weathering. Sometimes that MS-21 faded in the sun badly enough that when the Australians decided to paint things "Chicago Blue" they picked a much lighter color than the US Navy had actually painted Chicago in the first place. (Odd but true all you rivet counters and paint chippers.)

Step 5: Touch up and add final details.

And last but not least I go back and add a little black to really deep shadows (like "under" gun barrels cast onto a deck or openings into a hangar) or the tops of stacks that would be completely sooted up.

With Japanese ships I also take a moment to put a black dot onto the bow and a gold dot onto that to approximate the chrysanthemum on the bow. By putting the black dot on first it gives the gold dot a little definition, making it look more raised. (And one dot on top of the other actually does raise it just a little.) Of course the US wasn't really using figureheads by WWII, so there's no parallel to that in this case. But the finished result looks something like this:


In the background you can see Independence and a US destroyer being laid down. On the ways in front of them are, I believe, USS Chicago and another US destroyer. (Two Sims class destroyers? Possibly? Would be easier to tell if they were in focus.)

So there's a bit on the "quick and dirty" paint job. It's not the best example, since there's so very little color contrast, but hopefully you get the idea. I'll go into more elaborate methods at a later date.

Thursday, August 11, 2011

New Developments in 1:2400 part II

Continuing from Part I . . .

Following those orders I'd been meaning to cool it for a while. I'd already bought quite a lot that month. (Ah, good intentions!) But a gaming store in St. Louis was liquidating the stock of another store that had folded, and my oh my did they have some ships. At quite a discount. Even factoring in gas money (not insubstantial) I was still able to get things at prices I've never seen before and will probably never see again. And I bought fancier stuff, too. Some GHQ. A little C in C. Even some Superior and Viking Forge. The VF models were older and pretty basic, but the Superior ships were surprisingly nice.

So here we go. First, a few Brits:

Here's my rendition of Superior's Hood.


The bow and stern were a little bent, but they straightened out more or less adequately. All in all, I'd say it's a nice model. It's a very good compromise between the fiddly delicate detail of GHQ or C in C and the simple ruggedness of Panzerschiffe.

GHQ's Prince of Wales is rather a case in point.


The ship is almost too busy to my eye, and the secondary armament is ludicrously delicate. The gun barrels were so badly bent I couldn't straighten enough of them, even with extras, and had to manufacture replacements for a few from sprue. (Which works fine. In the end I think the plastic actually makes better masts and gun barrels. And as a bonus it's much easier to work with.)

On the other hand, their "Illustrious" looks very nice.


Not really quite like an Illustrious, strangely, but lovely. So I tinkered with it a bit and used it for Implacable. (For present I think I might well buy GHQ carriers and escorts, but I suspect I'll tend to stick to Superior and C in C for the cruisers and wagons.)

Their Essex is quite simply magnificent.


Unfortunately (or maybe fortunately, given PoW) this one was missing its 5"/38s, so I made them from stock. I also added the homing beacon, tinkered with the radar a little, and cut open the hanger.

This pair started out as Viking Forge's Vestal.


Their Vestal isn't a bad model, but it was in her fit from the 20s, so I stripped her more or less down to the hull and started over. I used the second one as USS Harry Lee, which was about the right size and shape.

Here's another GHQ offering:


Their flowers are quite lovely. They're busy little ships, to be sure, and the mold was misaligned on at least one of them, but not so badly it couldn't be fixed. And of course, as always, I find you need to add the masts. (To my eye no ship looks right without them.) But once detailed and painted my heavens but aren't they pretty? I love tinkering, but I'd never in my wildest dreams be able to carve such a nice ship. These three approximate Dianthus, Clematis, and Asphodel.

Here's an interesting exercise in comparison.


From left to right these represent Princeton, Belleau Wood, and San Jacinto. They also represent three different companies interpretations of an Independence class carrier. Again, from left to right: Panzerschiffe, Viking Forge, and C in C. The Viking Forge ship was a particularly rough casting requiring a lot of TLC. I added the 40s and truss masts to both the former ships. The VF offering also required me to remove some very poorly cast detail. (The gun tubs for the 40s were pretty misshapen, the "quad 40s" cast onto the bow and stern looked like, well, I don't really know what. Not like quad mounts, anyway.) All the C in C ship required was the radar fit. The tubs aren't arranged quite correctly for San Jacnito, at least, but it was otherwise pretty enough that I left it alone.

Which brings me back to a very nice Superior ship. Even though I've already got a pretty tolerable Soryu, I can rarely resist a carrier model. I figured I'd use this one to make an Unryu, which is about the same size as Soryu. (Not surprising, since they were a development of Hiryu, which was herself a modified Soryu.) I settled on Katsuragi. When you buy models at fire sale prices you take it for granted that pieces will be missing. This one had no island. Fortunately I had a spare Kaga island I could kidnap. (It's not quite right, but it will do.) Some hacking and slashing of gun tubs, a little green stuff, and some sprue later and I ended up with this . . .


From meatballs back to pasta and another comparison . . .

(Yeah, I know. No Hinomaru to be seen. Still, it's the idea of the thing.)

Recall that I said the Superior battleships seem like the nicest ones to me. (So far anyway.) Well, that impression is partly from a very nice Littorio. Yes, the guns are a little oversized, but at 1:2400 that's not a bad thing. And casting the secondaries onto the deck is probably the right way to go. Anyway, what with such a lovely Littorio, my earlier Vittorio Veneto needed updating. Ive decided that I can, in fact, add anchors, breakwaters, and anchor chain.


And last but not least in this section (II of III) is a small Italian seaplane tender named Giuseppe Miraglia. This is another Viking Forge offering given the once over. It was a clean enough model, but a little simple. And again, the fit wasn't quite right for WWII. So I spruced it up a bit. I'll try to go into more detail on some of the conversions at a later date, but here's the finished product:

Concluded in Part III.