Showing posts with label terrain. Show all posts

Sunday, June 12, 2022

Making Space for Adventure: Part I, Building "The Grid"

Last fall my friend Jay Bobson convinced me to go all in on a kickstarter for some laser cut terrain. I was a little skeptical at first, for reasons I'll get to, but I'm glad I did. Jay was really excited about modular set called The Grid from a company called Raybox Games. There's quite a lot of similar systems available in other formats. You can cast them up from hyrdrocal, print them on card stock, or even 3D print them from STL files. (As a native of St. Louis I have to love that file extension.) I expect there's even other lasercut MDF offerings out there. But I'd always figured I'd just do it myself with cardstock and patience. Thing is . . . I never got around to it. So I'm glad Jay talked me into it. Even if the kickstarter isn't precisely what I had in mind, it's the bones to something really nice. It gives me a place to start, and it really would serve the purpose as is, with a bit of paint, for quite a lot of gamers at a price that's not at all unreasonable.


It's a pretty decent set: nine rooms and fifteen corridors of assorted shapes and sizes with sufficient doors and connectors to make it all work. And a few barricades and boxes as scatter terrain. You can punch them out of the cards and build them up with more or less no tools or glue required, though tools make the process easier and the fits better, and glue makes the final product more solid.


And you know what? That's fine. You can play a game with that. But it's not me. I want a little more in my table. Paint is an obvious start, but there's something just a tad dissatisfying to me about this . . .


That's right ladies and gents: it has half-height walls. Which they regard as a selling point, oddly. Maybe some folks like the greater easer of reaching across the walls to move their miniatures, but to me half-height walls aren't really that much more convincing than no-height walls. My tiny little actors (who are still very much in need of makeup) are obviously on a set no matter what angle you choose. Not only is the fourth wall broken . . . they're all broken. There's a floor and some somewhat practical doorways, but that's it. Not much more than the set to Rosalie Wildest's Our Station. I hope you like post-modernist theatre! (Oh, fine. I do. Honest. I swear. I actually do.)

Wait, this is a game you say? What? Nonsense! It's a story. And stories need proper sets!


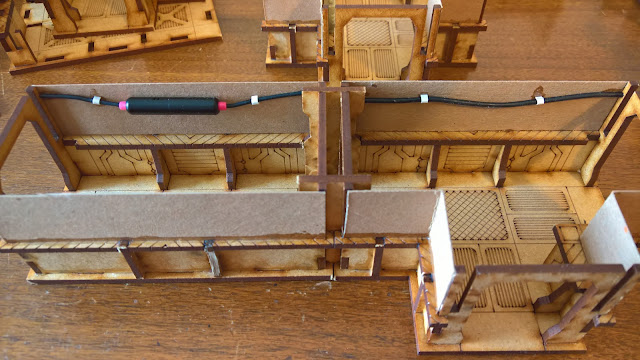
So I began by adding simple cardstock constructions to complete the walls. And even without lighting, costumes, makeup, props, set dressing, or even paint I find the effect greatly improved. Not only can our tiny actors figure out their blocking, but the lighting designer and game-a-tographer can better see the sight lines and understand their roles.


The next step is to begin to dress the emerging set: make it look lived in. Add some gee-gaws and gribblies; a cable here and a letterbox there.


For this I took a dive into my bits box, of course. A growing array of broken headsets supply plenty of cable and interesting little cylindrical attachments that could be a communications junction, a power relay, or a CO2 scrubber. Curtis Fell of Ramshackle Games kindly provides an endless supply of extra bits with his shipments: structural elements and extra weapons or tools, for instance. Off cuts of sprue can provide quite interesting shapes to serve as buttons, speakers, or even a letterbox. (I think that was actually a leftover bit from a B-17 dorsal turret, but don't quote me on that.) And with that extra bit of detail I think we're really beginning to get somewhere! I can imagine our heroes exploring some mysterious space station, or derelict hulk floating forlorn in the void.


And that most important of all shots, the Kubrickian corridor shot, actually looks like a corridor. (Especially when you improvise a ceiling by stacking other tiles on top.)


This project obviously has a way to go yet, but I think it might be enough for a multi part series showing some "work in progress." I'll keep you posted as I get further in. As always, thanks for joining in on the ride.

Sincerely,
The Composer


Saturday, January 6, 2018

The Carnival House

I've long been of the opinion that every good story needs a seedy side. Star Wars has Mos Eisely. War and Peace has Pierre. The Love Song of J. Alfred Prufrock has . . . well . . . everything. It's probably not too subtle that Logansport is the border boomtown of my little space western, but so far all the buildings had been pretty pedestrian. Nothing too flashy. A couple nondescript houses, a greenhouse, a factory shed, some shacks, heck, even a church. I still need more seedy, but at least this was a start.

To say I'm a bit late talking about this is an understatement. It's a project I did nearly a year ago. I've been aware of Plast Craft Games scenery for a while, having seen Cheetor's review of their ColorED line. I decided I should give them a go and picked up a two story building from their Designed for Carnevale range. The model itself was fairly simple. The structure was mostly a fomacore material with a plastic coating of some kind. The major pieces were provided in pre-cut sheets and you just punched them as necessary and glued. The windows, doors, and railings were separate details. The build should have been easy enough, seeing as the kit had maybe a couple dozen parts at most, but it was slightly complicated by the fit. the resin windows and doors did not fit the cutouts terribly well and there was much gap filling to be done. A second minor issue was the spacing of the front door an eighth of an inch or so above the bottom of the model with no provision made for a step. To deal with the gap I fabricated one out of a couple pieces of leftover foamcore.


And of course I added a little spackle detailing to make the building look a little more worn and weary. All that said, it painted up rather nicely and the price wasn't too bad, so I can't really complain.


While my review is a little mixed, it would be well to keep in mind that these are quite a bit less expensive than some of the other options out there, and this was stock from a local hobby store that might have sat too long in a hot car on the way to a convention. (One or two things seemed a touch warped.) If everything had been a little more square it's possible things would have fit better. And for the price it's really not too bad at all.

Anyway, thanks for reading along.

Sincerely,
The Composer

Wednesday, February 4, 2015

Nuclear Renaissance Man

No, doc, it's not a cosmic rebirth, it's "Gorilla Gone Noughty in the Moab Wastes" . . .


. . . and a few other things along the way. It's time to wrap up January . . . a few days late and a couple of miniatures short, as per usual. We'd have done this quicker, but we had a little accident at the paint store. That can of dullcoate? Yeah, not so much. Seems it was the gloss. I hate the gloss. Can't ever completely get rid of it, though I've heard a course of antivirals helps. With time we're dulling things back down as best we can, but there'll probably always be a little residual glow from the infection.

Still, there's some good work here. Don't really want to consign them to the "strip and start over" bin just yet. Given that, we'll start with a fellow who used to go by Big Robb. Now his friends call him Robbie the Robot, or just Robbo. Of course they tend to do that when he's not looking directly at them. He's a little hard of hearing, so he misses things like that. He used to be the still-master at the famed Cap'n Oldermould fermented mould distillery until a vat explosion (who put the 'splodey squig in dere?) left him without his hands, most of his right shoulder, anything below the rib cage, and about 80% of his brain. Fortunately, orks don't really use that part anyway and most of the rest of that stuff can be replaced. Doc Hobble and Mr. Burn duly stitched him back together, added some new bits, and adopted him into the troop of "dreadlies."


This fellow is from the Ramshackle Boneyarders range of Nuclear Renaissance figures. They call him Gorillagon. (I can see why.) I've shown him in the company of some more standard orkoids above to give comparison (and to acclimate him into his new unit.) Below you can see him in the mixing it up with a short-leg oldhammer ork dreadnought, an ogryn, and the dual occupancy body members of Squigfeather's crew. He's a big boy, this Gorillagon. I think he absolutely fits right in among the orks. He even comes built in with some orky tooth pattern decoration that's just screaming for elaboration. There are several arm options, so mine isn't necessarily quite the same as yours will be, but it's a straight up build. I didn't tinker with it beyond cutting off the cast-on scenic base and replacing it with my own.


My new years resolutions included work on my eldar force and my genestealer cult. You can see a little bit of both here. These four fellows were also victims of the "gloss paint debacle." Even after considerable dulling they still look a twitch shinier than I'd like, but hey, they'll be okay.


To finish out, I built these two little terrain pieces a while back and then never got around to posting them. Both started life as packing materials, which I find to be a source of endless inspiration. They often look quite industrial. The first was the plastic insert in a box of 1/700 aircraft I'd picked up for some naval wargaming. (And which really ought to be the subject of their own post one day.) To it I added two worn out faucet cartridges, a small anime model piece whose provenance is lost to me, and some styrene stock.


Next up was the insert from . . . a round air freshener box? Add a few bits and some paint and viola . . . you have an industrial wastewater tank, or a well (which might be the same thing in some parts of the 40K empire) or a cistern . . . something like that. A concrete pond of some stripe. As an added feature, the plastic was clear, so you can make a very glossy pond surface simply by painting the back not the front.


Here's the two of them painted up and with a little added foliage. (Abandoned industrial sites ALWAYS have plants in the darndest places. Plants are patient. If it will collect dirt a plant will grow there eventually. And make it bigger so it collects more dirt and so on.)


So January wasn't too bad: an adventurer, several space slann, a bunch of trees. a couple of elves, a pair of bugs, and some industrial leftovers. Not my best month ever, but not bad. February is shaping up to be equally interesting if not more so, so stick around.

As always, thank you for reading. I hope you liked what you saw.

Sincerely,
The Composer.


Sunday, January 4, 2015

The Forest for the Trees

There's a fairly common misperception that deserts are sandy boring places devoid of life. My wife, who grew up in a lush tropical environment where virtually everything is green and often wet, was briefly aghast at the idea that I wanted to take her to the spooky waterless wastelands that make up a fair part of the U.S. But then I showed her pictures and she changed her mind. Deserts, you see, come in many shapes and sizes. And many of them, perhaps even most, have trees. In fact, they come in a fairly dizzying array of shapes and sizes. The desert southwest is home to a wide array of cedars, junipers, and small to medium pines with even quite large trees like the ponderosa pine thrown in where there's enough water. Along river bottoms you'll even find wet trees like cottonwoods and willows. Below are a few examples in Utah and Arizona:

Pinyon and juniper are everywhere on the Colorado Plateau. At times they become sufficiently thick you can call them a forest. (They're often thick enough to conceal the cliffs that sometimes come out of nowhere, leaving you "rimrocked." Watch your step. You can just as easily find yourself at the top of such a scarp as at the bottom.) This somewhat thinner stand surrounds Square Butte in Arizona.

Large Pines like the Lodgepole, Ponderosa, and Douglas Fir (apparently not actually a Fir) can often be found at higher elevations, such as this alcove at Middle Emerald Pools above Zion Canyon in Utah.

Small and scraggly conifers surround one possible proxy for Lace Rock, Double-O Arch in the back of the Devil's Garden at Arches. (Very near Moab Utah. Not an accident. Someone might possibly have pictures of me inside the upper arch when I was rather young.) I won't belabor the point further, but if you want to see a little more of my inspiration I've slapped up a folder with some of my old travel photos.

Anyway, I digress . . .

Last year, after Christmas, I had a brilliant idea. When I went to throw the tree out there were, of course, many branch tips that fell off. Not too surprising, I'd guess. Well, to me they suddenly looked much like small trees themselves. Aha! I thought. I have new trees for my gaming table. Now nearly a year later I've finally done something with them. (Just in time to save more and larger chunks of greenery.)

The basic idea is pretty easy. I glue the branchlets to small copper plated zinc bases I "buy" from the US mint at a hundred for a buck. (I'm not at all sure I could buy washers cheaper, but I'd have to drive to the hardware store to find out, which would require me to burn gas doubtless making them more expensive. And they'd have holes in the middle. These don't. Advantage to Mr. Lincoln.) So anyway, using them is little more complex than gluing them to a base with CA, painting the base, and coating with your favorite ground cover. I use full strength PVA (white glue) and playground sand with the occasional clump of Woodland Scenics ground foam for small bushes.


It takes surprisingly few trees to busy up a table quite a bit. 


And of course I have plenty of materials for some new variations. (More when the current tree departs.) Should be a right busy forest soon enough.


Anyway, thank you as always for reading. I hope there's something useful and interesting here. See you next time.

Sincerely,
The Composer


Sunday, December 21, 2014

Good Fences for Bad Neighbors

Someone once said good fences make good neighbors. Tell that to the Picts and the Mongols. Or for that matter China and Rome. Neither good fences nor great walls will keep out the really rotten neighbors. But hey, that never stops anyone from trying.

And in the far distant future of Oldhammer there were lots of folks to keep out, both casual and determined, so I'm guessing fixed linear obstacles would be a rather common feature. To that end, I've built myself some larger and more defensible no-trespassing markers. I built fence for casual around the Graceful Ghost. Now I wanted some wall for determined, as the next episode, Hello Kitty on a Hot Tin Roof, was to take place in a fortified encampment.


This is a remarkably simple job. The walls are basically heavy cardboard packing components I salvaged from work (a great source for unwanted parts) with a couple coats of spray paint. They were cut in a few different shapes and heights to fit tightly around whatever they protected, which worked well to create platforms and bastions.


But the platforms were just a touch short, so I used some scrap blue foam to raise them enough that the high walls would fall about chest high on a typical 28 mil miniature. Which works out to be about chin high on the shorty-grots who pulled guard duty in most of these photos. The walls themselves are quite tall enough to impede even quite large vehicles and critters.


Of course no large barriers in the middle of nowhere are complete without graffiti. The decoration will be an ongoing process for some time yet, but you can see the start now. The movie reference below need enlargement yet, but I think it's enough to get the point across. Added later will be some weathering, a rock "toor" poster or two, and more art, notices, and maybe some actual official signage. (Half buried under the layers of newer creation.) 


My goal is to have the structure and walls scaled so that they can be usefully incorporated together. The building below was left intentionally windowless on the first floor rear for that very reason. I also used the shorter wall sections as my model for one floor's height. I considered making one floor the height-plus necessary to fit elegantly behind the taller wall sections at reasonable platform height, but that was just a little too tall for my taste. As it is the huts already have nice generous twelve foot ceilings, more or less. (I take a standard 28 mil fig as six feet, which is a convention I learned long ago in a scene design class I never quite finished.)


I'm quite sure more walls and buildings in a variety of styles will come in time. Stay tuned, there's an AAR that should follow quite soon. (From the game that needed the walls.) And as always, thank you for reading.

Sincerely,
The Composer


Tuesday, September 16, 2014

Intergalactic Hoosegow

Yesterday in Intentional Terrain I hinted that I was working on an abandoned jail for my temporarily orkified mine camp.


In general it's a pretty standard blue foam build. Press texture in. Draw blocks with a ball point pen. You know the drill . . . The only abnormality is that I insist on mudding things selectively, which I described yesterday. You can see below how I block-textured small sections of the wall and left the rest blank before covering the remainder with an irregular skim-coat of joint compound. (Or mud, if you prefer the trade name.)


Well, this morning when I went to paint the thing I made a little booboo. For those who are unaware styrene is a non-polar organic which is readily broken down by non-polar solvents, like those in CA+ or most rattle cans. When gluing this isn't necessarily a problem, because the melted styrene eventually solidifies together making a pretty decent bond. This is precisely how your old plastic glues work: they literally melt the plastic which then recrystallizes in a modified form. There's clearly a chemical reaction as the resulting material is rather different (probably not polymerized) and you can often detect a slight release of heat when you drip a lot of solvent based glue onto foam. Further, the odor is rather distinct. But it works, and fairly quickly at that, which is the important thing from my perspective. I don't have the patience for PVA.

But I digress . . . when you're painting styrene based foam, like the blue stuff (and pink and white, for that matter) it's generally best to use a plastic friendly, i.e. acrylic paint. Some hardware stores do indeed sell this in a rattle can. I have bought some. . . . But that wasn't the rattle can I grabbed this morning. Somehow I didn't look at the label, just the color on the cap: grey. Grey is good sometimes. Styrofoam and xylene, however, aren't the best of friends. You might notice a rather distinct change in texture between the above pictures and those below. Thanks to the xylene (and possibly the acetone) my blocks became much rougher and more porous on the surface. Hey, that's okay. Just makes 'em look all that much more arid/deserty. I have, in point of fact, used this property in the distant past. Xylene REALLY eats into low density white styrofoam making positively gorgeous battle damage. Todays experiment was something of a happy accident. Not complaining, mind you, just observing.


The interior isn't much to write home about, but it's there. The railing isn't pretty, but it should serve to help keep players from knocking miniatures down the stairs. (Much as it would in reality.)


The pillars are likewise crude, but they work to hold the floor. And the stairs would be a splendid trip hazard to unwary attackers or escaping prisoners. (Uneven stairs trip people up terribly. And these are very, very uneven.)


I suppose this isn't really most properly a jail. It's really more of a small blockhouse for the local constabulary. As you can see, the windows were cut with defense in mind.


Of course, one can't completely resist the urge to see what the view might be like from the inside.


I'm sorry, what did you say about Squiggycap's ride? He's got good taste. And it's red, so it'll go faster, as every orc (and police officer) knows.

There will be more later, as there's still some small structures and set dressing to be made, but the camp is well on it's way. Honestly, it's pretty well usable for the upcoming episode right now, but I still have time before filming begins, so I'll use that to improve what's beginning to look like a good thing.

As always, thanks for reading.

Sincerely,
The Composer